

Most weekend builders assume a gazebo is essentially a shed roof on posts — set four beams in the ground, nail a frame together, done. That assumption is exactly what causes gazebos to tilt, crack, or blow over within a couple of winters. Building a garden gazebo is entirely achievable as a DIY project, but the sequence matters: footing depth, post spacing, and joist sizing all follow specific structural rules that aren’t optional once you’re dealing with a roof load and wind exposure. This walks through the full build in order, from layout to roofing, with the measurements that actually matter.
Planning and permits before you dig
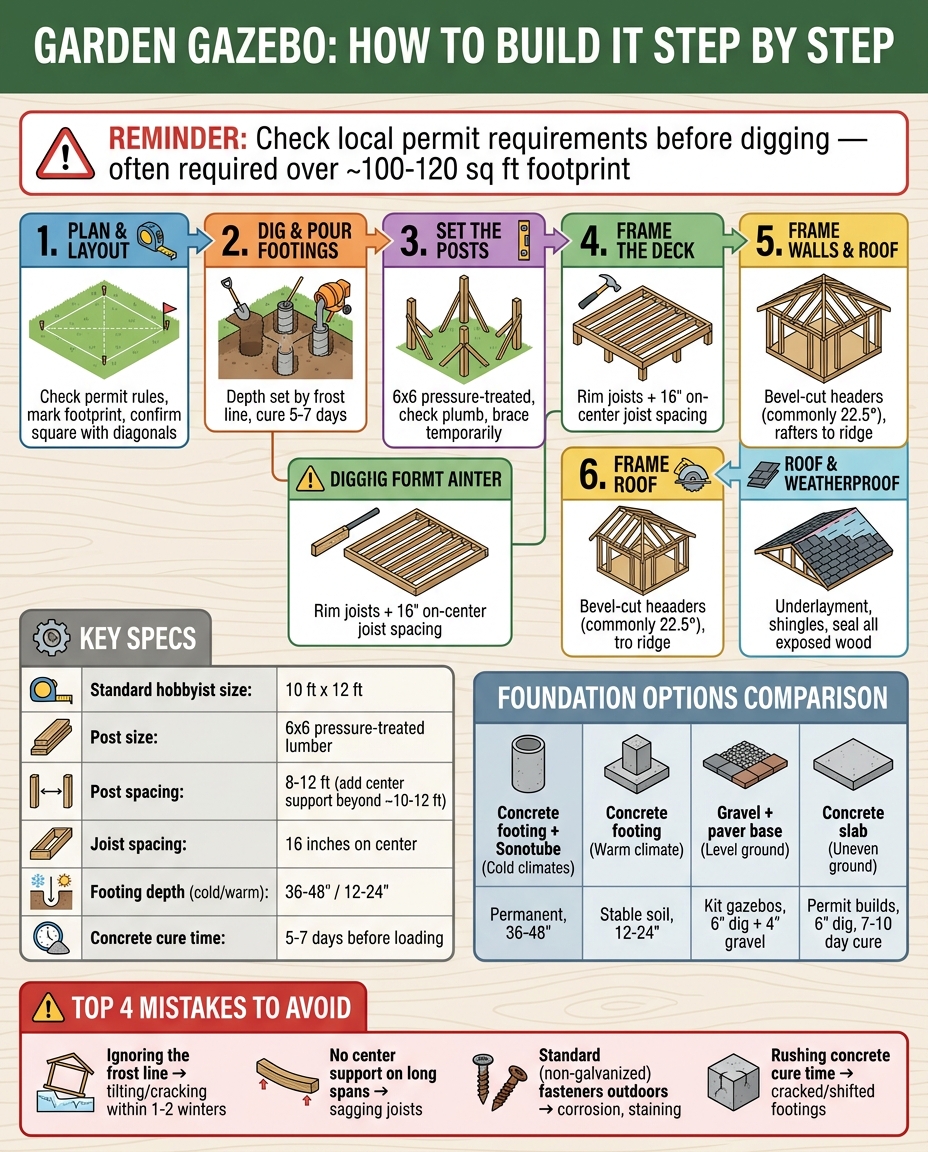
Most municipalities require a building permit for any freestanding structure over a certain footprint — commonly around 100-120 square feet in many U.S. jurisdictions, though this varies significantly by location — so check local rules before ordering materials. A standard hobbyist gazebo runs roughly 10 by 12 feet, large enough for a table and seating without requiring engineered structural drawings in most areas. Mark the footprint with stakes and string, then check the diagonals are equal length to confirm the layout is square before any digging starts.
Step 1: Dig and pour the footings
This is the step people most often shortcut, and it’s the one most responsible for gazebos that lean or heave after a year or two. Footing depth is governed by your local frost line, not by how heavy the gazebo is — building codes based on the International Residential Code require footings to extend below the frost line shown in local code tables, because water in the soil expands roughly 9% when it freezes and will physically push a shallow footing upward over repeated winters. In most northern climates this means digging 36 to 48 inches deep; in warmer regions with stable soil, 12-24 inches is often sufficient.
Use a post-hole digger or a rented power auger to dig four to six holes (depending on your post count and any center support), sized to accommodate an 8-inch concrete form tube (Sonotube). Add several inches of gravel at the bottom of each hole for drainage before pouring, since standing water at the base of a footing accelerates post rot even when the concrete itself is sound. Set galvanized post anchors or anchor bolts into the wet concrete, and let the footings cure for 5 to 7 days before loading any weight onto them.
Skipping the frost-line depth is the single most common cause of gazebo failure — a footing poured even 6 inches too shallow can heave enough over one winter to visibly tilt the entire structure.
Step 2: Set the posts
Standard gazebo posts run 6×6 lumber, pressure-treated for ground and weather exposure. Set each post into its galvanized post base and check plumb on two adjacent faces with a post level before securing — a post that’s out of plumb by even a few degrees compounds into a visibly crooked roofline once the frame goes up. Brace each post temporarily with diagonal scrap lumber staked to the ground while you set the remaining posts, since a single unbraced post will drift out of position under its own weight or a light breeze.
For a typical 10×12 layout, posts sit roughly 8 feet apart on the shorter span and 10-12 feet on the longer span. If your design spans more than about 10-12 feet between posts, consider adding a center support post or a mid-span beam (“skid”) — without it, floor joists over a long unsupported span will flex noticeably underfoot even if they don’t structurally fail.
Step 3: Frame the deck
With posts set and braced, install rim joists around the perimeter using galvanized joist hangers, then fill in the field joists at consistent spacing — 16 inches on center is the standard spacing that comfortably supports 2×6 joists across typical gazebo spans without excessive flex. Use pressure-treated lumber throughout the deck framing and corrosion-resistant deck screws or nails, since standard fasteners will corrode and stain the wood within a few seasons of outdoor exposure.
Check the frame is square again at this stage — measuring diagonals corner to corner — before attaching decking boards, since any drift in the frame becomes far harder to correct once boards are fastened down.
Choosing a foundation type if you’re not pouring footings
Not every gazebo needs buried concrete footings. If your site is level and drains well, a gravel and paver base is a simpler DIY alternative: excavate roughly 6 inches, add 4 inches of compacted gravel or crushed rock, then lay patio stones on top, checked level before the structure goes on. This approach works well for lighter, kit-based gazebos but isn’t a substitute for frost-depth footings if your local code requires a permit — check requirements before choosing this route to avoid having to redo the foundation later.
Step 4: Frame the walls and roof structure
With the deck complete, frame any knee walls or stub walls first — commonly around 30 inches tall on gazebo designs that include partial walls — then install the roof support beams connecting the tops of the posts. Header beams typically get cut with matching bevel angles (commonly 22.5 degrees for an eight-sided or hip-style roof) so they meet cleanly at each corner; a template or angle jig for repeated cuts saves significant time and keeps the angles consistent across all sides.
For the roof framing itself, rafters run from the outer wall plate up to a central ridge point or ring, depending on whether you’re building a pyramid-style or hip-style roof. Consistent rafter spacing and matching bevel cuts matter more here than anywhere else in the build, since any inconsistency becomes highly visible once shingles or roofing panels are installed.
Step 5: Roofing and weatherproofing
Sheath the roof frame with plywood or OSB, then install roofing felt or a synthetic underlayment before the finish roofing material — asphalt shingles, cedar shakes, or metal panels are all common choices, with asphalt shingles being the simplest for a first-time builder to install correctly. Flash any roof-to-post transitions carefully, since these junctions are the most common source of water intrusion on a gazebo roof.
Once the roof is weathertight, apply an exterior wood stain or sealant to all exposed lumber, including the underside of the deck if accessible — untreated cut ends and exposed grain absorb moisture fastest and are typically where rot starts first, even on pressure-treated lumber.
Comparing foundation and post options
| Option | Best for | Typical depth/spec |
|---|---|---|
| Concrete footings + Sonotube | Permanent structures, cold climates | 36-48 in (below frost line) |
| Concrete footings, warm climate | Stable soil, no frost concern | 12-24 in |
| Gravel + paver base | Level sites, lighter kit gazebos | ~6 in excavation + 4 in gravel |
| Concrete slab | Uneven ground, permit-required builds | 6 in excavation, 7-10 day cure |
Common mistakes to avoid
- Ignoring the frost line — the single biggest cause of gazebos that tilt or crack within a year or two of construction.
- Skipping the center support on long spans — joists spanning more than roughly 10-12 feet unsupported will sag and flex noticeably, even if they technically don’t fail.
- Using standard fasteners outdoors — non-galvanized nails and screws corrode and stain pressure-treated lumber within one or two seasons.
- Rushing the concrete cure time — loading posts before the 5-7 day cure period risks cracking or shifting the footing before it’s reached usable strength.
Frequently Asked Questions
Do I need a permit to build a gazebo in my backyard?
Often yes, once the footprint exceeds a certain size — commonly around 100-120 square feet in many jurisdictions — so check with your local building department before starting, since a structure built without a required permit can create problems later when selling the property.
How deep should gazebo footings be?
Depth depends on your local frost line, not the gazebo’s weight — codes based on the International Residential Code require footings to sit below the frost line, which typically means 36-48 inches in cold climates and 12-24 inches in warmer regions with stable soil.
What size lumber is standard for gazebo posts?
6×6 pressure-treated posts are the standard choice for freestanding gazebos, offering enough structural strength for typical roof loads without requiring engineered lumber.
How far apart should gazebo posts be spaced?
Most hobbyist gazebos space posts 8-12 feet apart; spans longer than roughly 10-12 feet generally need a center support post or mid-span beam to prevent floor joists from sagging.
Can I skip concrete footings and use a gravel base instead?
Yes, for lighter kit-style gazebos on level, well-draining sites — but check your local permit requirements first, since permit-required structures typically need footings that meet frost-depth code regardless of the gazebo’s weight.
source: domonline.pl